Wednesday, March 6, 2019

How to reformat a personal computer?

Steps To Reformat A Personal Computer

Start your pc and press key F2, F12 or delete key (Depends on your PC model).


Your PC will boot from CD and windows installation will start. Press Enter at this screen.


Accept License agreement by pressing F8 key.


Delete the partitions.


Create the partitions.


Define the size of partitions.


Now select your desired partition for installation of Windows XP and press enter.


Choose to format the partition. Choose NTFS file system quick. 


Setup will format the partition.


10 After formatting, setup will start copying files on to the hard disk.


11 After copying of files, setup will start installing Windows. 


12 Select desired language and regional settings, when prompted by setup.


13 Enter windows key.


14 Type a name for your computer.


15 Select time and date settings and time zone according to your country.


16 Provide network settings for networking pc's or select typical settings and press enter.


17 Setup will install devices and register components.


18 After completion setup will do a cleanup of files and will restart your pc automatically. At this stage you can remove CD from drive.


To Create A Partition


What is disk partitioning?

Disk Partitioning is the creation of one or more regions on a  hard disk or other secondary storage, so that an operating system  can manage information in each region separately.

Partitioning is typically the first step of preparing a newly manufactured disk, before any files or directories have been created. 


Remember:

                     1 KB      = thousand bytes
                     1 MB     = million bytes
                     1 GB      = billion bytes
                     1 TB       = trillion bytes

Remember:

                     1 KB      = 1024 bytes
                     1 MB     = 1024 KB
                     1 GB      = 1024 MB
                     1 TB       = 1024 GB

EXAMPLE:

Original size/capacity = 40995 MB

P1   - 50 %             =      40995 x .50       =        20498    
P2   - 50 %             =      40995 x .50       =        20498 


Original size/capacity = 40995 MB

P1   - 25 GB           =      25 x 1024         =         25600
P2   - 25  %            =      40995 x .25      =         10249
P3   - The rest     
  

Original size/capacity = 38162 MB

P1   - 15 GB           =      15 x 1024          =        15360 
P2   - 30 %             =      38162 x .30       =        11449
P3   - 100%           


Original size/capacity = 38162 MB

P1   - 39 %            =      38162 x .39         =        14883
P2   - 11 GB           =      11 x 1024            =        11264
P3   - 100%                               
            

Original size/capacity = 40995 MB

P1   - 41 %             =      40995 x .41          =        16808
P2   - 10 GB           =      10 x 1024             =        10240
P3   - The rest                               


Tuesday, February 19, 2019

How to Share file and printer to a computer network?

PRELIMINARY STEPS

 Create an IP Address


SERVER (1)
CLIENT (2)
SUBNET MASK
A
100.100.200.1
100.100.200.2
255.0.0.0
B
150.130.150.54
150.130.150.55
255.255.0.0
C
200.150.180.21
200.150.180.22
255.255.255.0


 Configure  the IP Address
  • IPCONFIG ecommand is a fast was of determining your computer's IP address and other information, such as the address of its default gateway.
  • PING is used to test the connectivity.

     Set Windows firewall settings

SET WINDOWS FIREWALL SETTINGS
Turn off firewall


  • FIREWALL is a network security system that monitors and controls incoming and outgoing network traffic based on predetermined security rules.


    Set up a home or small office network

SET UP A HOME OR SMALL OFFICE NETWORK
Network Setup Wizard


  • NETWORK SETUP WIZARD is a built-in feature of windows that let you setup a network for computers running Microsoft windows operating systems.


Sharing file on a network (Server)


1.   Place the file inside the folder
2.  Right click the folder
3.  Click Properties
4.  Click Sharing
5.  Click Share this folder on the network
6.  Click Apply
7.  Click OK


Checking the file (Client)

1.   Click Start button
2.  Click Run
3.  Then type \\[IP address of server]


Sharing printer on a network (Server)


1.  Click Control Panel
2.  Click Add Printer
3.  Right click Printer
4.  Click Sharing
5.  Click Share this printer
6.  Click Apply
7.  Click OK


Connecting printer on a network (Client)

1.   Click Run
2.  Then type \\[IP address of Server]
3.  Double click Printers and Faxes
4.  Right click Printer
5.  Click Connect

Wednesday, January 16, 2019

WHAT IS NETWORK ADDRESS OR IP ADDRESS?

NETWORK ADDRESS
  • It is most commonly known as IP Address or Internet Protocol
  • It is the numeric address of a computer connected to the network. 
  • It is also known as Dotted Decimal Notation. It is a set of number called "octets".


Ex. Common IP Address
  1. 172.16.254.1
  2. 192.168.1.1 


DIFFERENT IP VERSIONS
          a). IPv4 =IP version 4
                  is the fourth version of the Internet Protocol (IP). It is one of the core protocols of standards-based internetworking methods in the Internet, and was the first version deployed for production in the ARPANET in 1983. 
                                                                                       

          b). IPv6= IP version 6
               Internet Protocol Version 6 (IPv6) is the most recent version of the Internet Protocol (IP), the  communication protocol that provides an identification and location system for computers on networks and routes traffic across the Internet 

HOW TO GET BINARY DIGIT/ HOW TO MAKE NETWORK ADDRESS?

*BINARY DIGIT HAS A TOTAL OF 255

CLASSES OF IP ADDRESS

  1. Class A - 1 to 126
  2. Class B - 128-191
  3. Class C - 192- 223
  4. Class D - 224- 239
  5. Class E - 240-255


* 127- is a loop back function of a network.
* Class D - is a multicast.
* Class E- is reserved for future or experimental purposes.

Some examples of a typical home networks
  • 192.168.1.1
  • 192.168.2.1 
STEPS IN CREATING AN IP address
  1. Click Start Menu > Control Panel > Network and Sharing Center. (For Windows 8 and higher, search for and open Control Panel and select Network And Internet).
  2. Click Change adapter settings.


  3. Right-click on Local Area Connection and click on Properties.


  4. Select Internet Protocol Version 4 (TCP/IPv4) and click on Properties.


  5. Select "Use the following IP address" and enter the IP address, Subnet Mask, Default Gateway. and DNS server. Click OK and close the Local Area Connection properties window.

STEPS IN CONFIGURING ADDRESS

 
Step 1
Click Start->Control Panel->select and double click Network and internet connections->select and double click Network Connections.
 
Step 2
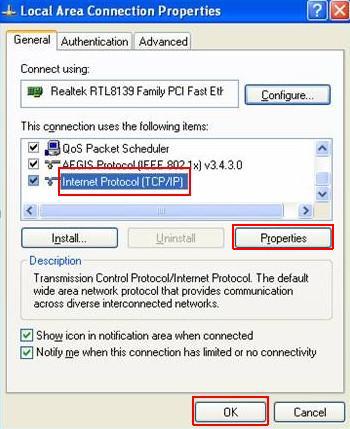
Double-click the Local Area Connection icon; highlight Internet Protocol (TCP/IP) tab in the Local Area Connection Properties window that appears:
 
Step 3
Double click it or click Properties. The TCP/IP Properties window will display.
 
Step 4
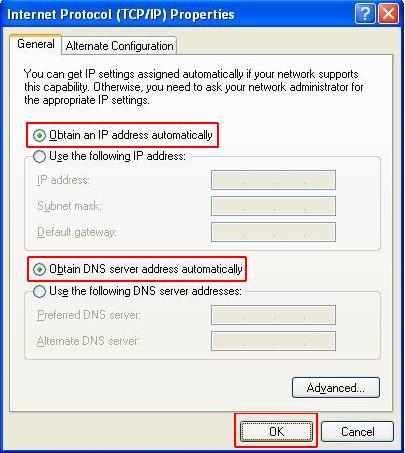
Now you have two ways to configure the TCP/IP protocol below:
1.     Assigned by DHCP Sever
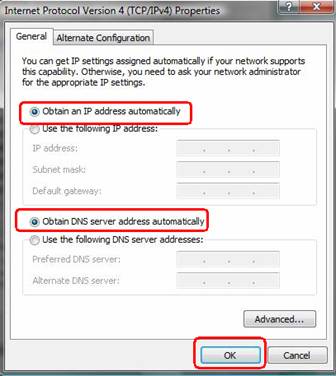
Select Obtain an IP address automatically and Obtain DNS Server address automatically, as shown in the figure below. These may be selected by default. Then click OK to save setting.
 
 
2.Assigned manually
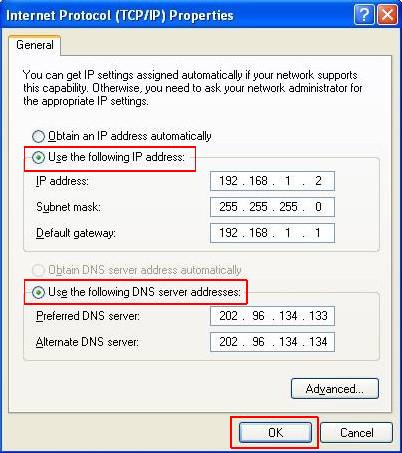
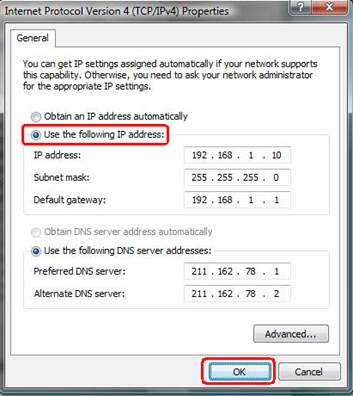
1) Select Use the following IP address, as shown in the following figure.
If the router’s LAN IP address is 192.168.1.1, please type in IP address 192.168.1.x (x is from 2 to 253), subnet mask 255.255.255.0, and default gateway 192.168.1.1.
 
2) Select Use the following DNS server addresses, as shown in the following figure. And then type the DNS server IP address, which should be provided by your ISP. Finally remember to click OK to save settings.
Note: In most cases, type your local area DNS server IP addresses into it.
The Preferred DNS server is same to default gateway. For Secondary DNS server, you could leave it blank or type in 8.8.8.8.
 
Step 5
Click OK to save and apply your settings.
 
For Windows Vista & Windows 7
Step 1
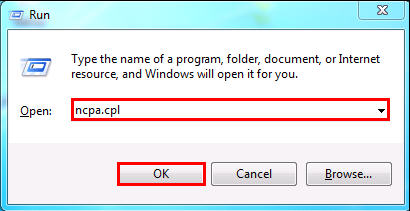
Click on windows key+ R key on the keyboard at the same time.
 
Step 2
Type ncpa.cpl in the box, then press OK.
 
Step 3
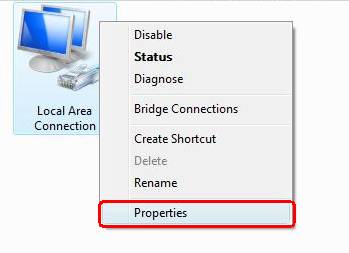
Select the local area connection, right click it and select Properties.
 
Step 4
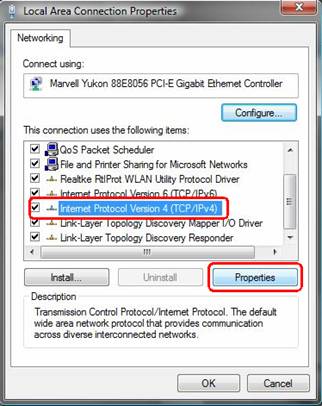
Select Internet Protocol Version 4(TCP/IPv4), double click it or click Properties.
 
Step 5
There are two ways to configure the TCP/IP Properties, Assigned by DHCP server automatically or manually.
1. Assigned by DHCP server
Select Obtain an IP address automatically and Obtain DNS server address automatically. If necessary, then click OK to save the settings.
 
2.    Assigned manually
1) Select Use the following IP address, type IP address, subnet mask and default gateway IP address into it.
If the router’s LAN IP address is 192.168.1.1, please type in IP address 192.168.1.x (x is from 2 to 253), subnet mask 255.255.255.0, and default gateway 192.168.1.1.
 
2)    Select Use the following DNS server addresses, as shown in the following figure. And then type the DNS server IP address, which should be provided by your ISP. If necessary, then click OK to save the settings.
 
Note: In most cases, type your local area DNS server IP addresses into it.
The Preferred DNS server is same to default gateway. For Secondary DNS server, you could leave it blank or type in 8.8.8.8.
 
Step 6
Click OK to save and apply your settings.

source: https://kb.netgear.com/27476/How-to-set-a-static-IP-address-in-Windows
             https://www.tp-link.com/us/faq-14.html
             https://www.techopedia.com/6/28587/internet/8-steps-to-understanding-ip-subnetting/4